Rose Care
Table of Contents
When you get home with your roses...
- Water your roses thoroughly both before and after planting. Soak bareroot roses overnight. If you can't plant your roses right away, be sure to keep them cool and wet.
- Prepare the site where your roses will be planted. They should receive at least 4 to 6 hours of sun daily, from spring through fall.
- Plant your roses as soon as possible.
Rose Spacing
This chart will give you an idea of average spacing, but roses will vary in size and habit, depending on climate and location. Adjust for your conditions - in colder areas, you may want to space roses closer; in warmer areas, further apart. Use the closer spacing if you mix different roses in a bed, and prune the larger plants and cut blooms frequently to control their size.
Example: If a bed is 10' x 12' (120 sq. ft.), and the suggested spacing is 24", you would need 30 plants (120 sq. ft. divided by 4sq. ft. per plant)
| Suggested Rose Spacing | ||
|---|---|---|
| Type | Spacing | Sq. Ft./plant |
| Hybrid Teas G randifloras Large Shrubs |
30" to 36" | 6' - 10' |
| Floribundas Small Shrubs | 24" to 30" | 4' - 6' |
| Hedges | 24" | 4' |
| Miniature Roses | 12" to 18" | 1' - 2' |
| Climbers | 4' to 5' | 12' - 15' |
| Tree Roses Standard Patio Miniature |
3' to 5' 3' to 4' 2.5' to 3.5' |
10' - 15' 10' - 12' 6' - 11' |
| English Roses | 36" | 10' |
| Ground Cover Roses | 48" | 12' |
Planting
If you have stored your roses for a few days, soak the roots in water again before planting. It is important to give roses plenty of moisture to get them off to a good start. Some growers ship roses with canes pruned to 8 to 10 inches long; when you plant, prune the canes back to about 6 inches. This helps the plant concentrate on developing the roots.
- Dig a hole 12 to 18 inches deep. Make sure it is wide enough to allow the plant's root system to easily develop after planting. This will make a stronger plant. Loosen the bottom and sides with your shovel.
- Fill the hole with water. It should drain in one hour. If it doesn't, dig deeper and improve the drainage - or mound the soil and plant the rose in a raised bed. Work in one part organic material - peat moss, leaf mold, compost, sawdust, or well-rotted manure, to two parts soil. A pH of 6.5 is best for roses. Adjust if necessary.
- Trim off any broken roots or stems. Build a mound of soil in the hole to support roots and to hold the plant at the proper height, with bud union at ground lever ( or 1 to 2 inches below in colder areas).
- Holding the plant firmly in place, fill the hole two-thirds full of soil mixture and tamp down lightly to remove any air pockets. Fill with water and let soak in, then fill the hole with soil mixture and firm gently.
- Your plants will leaf out faster if you mist the canes with water as often as possible while they are getting started. Roses need plenty of moisture, both above and below the soil, to fully develop in their new location.
Care for Roses after Planting
Misting
After soaking the roots and planting your roses in the ground, mist the canes often until the plants leaf out.
Watering
Roses need good drainage - roots should never sit in water. Soak the bed slowly and thoroughly to a depth of 5 or 6 inches with small flow of water. Sprinklers are fine as long as the bed receives enough to water the top 6 inches of soil and as long as the foliage can dry quickly. If you do water from above, do so in the early morning so the foliage has a chance to dry. This discourages disease.
To see if your roses need watering, scrape the surface of the bed. If you don't feel any moisture and inch below the surface, it's time to water.
Fertilizing
It's important to replace the nutrients your roses take from the soil through the growing season. Once your roses are fully leafed out, apply a balanced fertilizer to each plant, in a circle a foot or two from the base.
- Fertilize when plants are in full leaf.
- Fertilize again after first bloom.
- Fertilize 6 weeks before anticipated first frost (but not after Sept 1 in most areas).
- For proper hardening of canes for winter, do not fertilize late in the fall.
Mulching
Mulching is very useful for growing healthy roses. A 2 to 3 inch layer of compost, ground corn cobs, straw, or similar material discourages weeds, aids water retention and helps keep the roots cool during hot weather. Since some mulching materials will take nitrogen from the soil, replenish it with a high-nitrogen fertilizer.
Cultivating
Cultivate roses as shallowly as possible, just breaking the outer crust of the soil. This method will permit air to enter the soil and will not injure any roots growing near the surface. Never allow the soil to become hard at any time during the growing season. If you mulch your plants as described above, you should not have to cultivate at all.
Transplanting
The best time to transplant roses is in early spring, while they are still dormant. Prepare the planting holes in the new site ahead of time so that the plants will not be out of the ground too long. Prune the bush varieties back to 18 to 24 inches to make them easier to handle. Soak the soil thoroughly the night before, then dig the plants with a soil ball attached and move them to their new location.
Spraying or Dusting
When and how much to dust or spray your roses depends on where you live and the type of roses you have planted. Humid climates can have problems with blackspot, while dry climates with cool nights can encourage mildew. Hedge and shrub roses generally need less spraying than conventional roses.
Quick Reference Chart for Gorgeous Roses:
| Time of year | What to do | How to do it |
|---|---|---|
| Start in spring when buds begin to swell | Use spray or dust regularly, once every 7 days. Apply fertilizer around each plant. | DO NOT spray or dust in midday, when sun is hot. Dust when dew is on roses. Scatter rose food around each plant, cultivate lightly and water. |
| From appearance of first blooms until hot weather begins | Use spray or dust regularly, once every 10 days. | If you use dust: Be sure that both upper and lower leaf surfaces are covered with a thin film of dust. If you use spray: See package for detailed instructions on how to mix. Keep sprayer moving to keep spray well mixed. Apply mist spray thoroughly from beneath so that plants are covered with a thin film of spray residue. See package for detailed instruction. |
| Immediately after roses start to bloom | Fertilize plants again | |
| Whenever temperature rises to about 80ºF in midsummer | Do NOT spray or dust except after a rain or irrigation. | |
| When temperature is below 80ºF in late summer | Use spray or dust regularly, once every
10 days. |
|
| Six weeks before first all frost | Apply last fertilizer for the season. | |
| Whenever it rains | Spray or dust within 24 hours, continue regular schedule. |
Back to Top
Pruning
Roses are pruned to promote their health, vigor, and to give them direction - to tell them how and where to grow. Pruning gives the plants a shape, a style, removes unproductive wood and provides good air circulation.
When to prune
The best time to prune is before new growth starts in the spring, sometime after the last killing frost. Once growth is 2 to 3 inches long, you should not prune, since there can be significant damage from breakage. Fall pruning is necessary only when plants are extremely tall, to prevent wind damage during the winter.
Use any pruning shears designed for roses. A 2-inch blade gives the best results, or use long-handled lopping shears for larger canes.
What to prune
Weak or diseased canes. Winter-damaged wood, which looks brown on the outside, light brown and dry when cut, should be cut off 1 to 2 inches below the damage. Any branch crossing or rubbing another should be removed - always leave the newest, healthiest cane.
When in doubt
As a general rule, if you're not sure what to cut, wait. You can always make more cuts later when the bush has leafed out and you can see its shape more easily.
| How to Prune | |
|---|---|
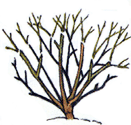
| 1. Trim twiggy top growth by about a third so you can see the structure of you plant. |
 |
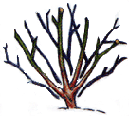
| 2. Take out dead wood, canes, that cross the center of the bush, and any shoots (suckers) growing below the bud union. |
 |
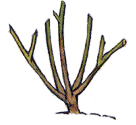
| 3. Shape the plant by removing some canes. You are safe in cutting back to 5-10 strong canes. |
 |
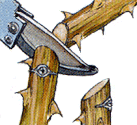
| 4. Cut 1/4" above dormant bud eyes that face the outside of the bush. New growth will come from these eyes. |
 |
Climbing Roses
These roses usually bloom best on two-year old wood, so prune very little. Take out any spindly new wood, older wood that is no longer blooming as well as it should, and damaged or diseased growth only.
Hedge Roses
Treat as you would any hedge, shearing off the top third of the plant, leaving the rest to grow.
Tree Roses
Prune back by about half, to encourage new growth and keep the compact, rounded form.
English Roses
During the first two seasons, allow the plant's basic framework to develop, pruning out only the small spindly shoots. Thereafter, for a smaller shrub with larger, better quality flowers, prune by one-half; for a larger shrub with more flowers, prune back by one-third.
Pruning sucker growth
Any shoot that grows from below the bud union of a grafted rose bush is called a sucker. These should be removed, since a sucker will not produce the same blooms as the upper part of the plant, and will rob it of strength.
After pruning
To help reduce dieback and protect canes from borers, paint the pruned ends with a commercial cane sealer, white household glue or clear nail polish after cutting. This is added protection against disease.
Tips for Great Cut Roses
- Cut roses in the early morning when the moisture level and sugar content are highest. Use a sharp pruner or knife. Make an angle cut just as the outside petals begin to open. Always leave at least two sets of five leaflets on each stem, so new flowers will develop.
- Remove thorns and leaves which will be below water level in the vase, and immerse in warm water. Re-cut stems under water. Add a floral preservative to the water to make blooms last longer.
- For prize winning exhibition roses, we recommend disbudding. Pinch out the side buds while they are small, leave only the top bud. This will concentrate the plant's energy into producing fewer, but larger, blooms.
Back to Top
Getting your roses ready for winter
Strong, healthy roses are the most resistant to winter damage. Leave the last blooms in the fall on the plant to form hips. This will slow growth and help them go dormant. Rake off and remove all leaves from the rose bed to prevent diseases.
Apply a dormant spray or oil such as lime sulfur to help get rid of diseases that might return in the spring.
Even during winter, your roses need water to keep them healthy and prevent them from drying out. If there is no rain or snow for more than a few weeks, you should plant to water.
Hybrid Teas, Floribundas and Miniatures
Roses do not need to be trimmed unless they are liable to be damaged by winter winds. Apply a final spray or dust to the canes and soil surface. In severe winters cover the crown of the plant with a soil mound about 6 inches high, then cover the entire plant and soil mound with hay or straw.
Climbing Roses
In severe winter areas, we suggest staking the canes to the ground and covering them with straw. Cover the base of the climber with soil, then tie the canes and wrap them in burlap to protect them from whipping in the wind and from drying out.
Tree Roses
If winter temperatures in your area fall below 10ºF, you should protect your tree roses. Remove the stake and lay the rose down. If the trunk cannot be bent without breaking, lift one side of the root ball so that the trunk can be laid flat. Cover the top, trunk, and exposed roots with soil, and then mulch with straw.
Shrubs and Hedges
These are hardy plants, but if temperatures regularly drop below 20ºF for extended periods of time, some simple steps should be taken to prepare them for winter. You should mound the plants with straw or hay as you would regular bush roses. If they are excessively tall, trim them back a bit to prevent wind damage.
Roses in Containers
If the temperature drops below 28ºF, move container roses into an unheated shelter. Be sure they are not near a window, where warm sunlight might start plants growing. Water lightly - enough so the soil doesn't dry out. Don't fertilize during the winter. When warm weather comes again, put the container outside and care for them as before.
Special Note:
- Remove the protective covering from your plants before they start to sprout again in spring. Leave the mulch on until all danger of frost has passed.
| Troubleshooting & Disease | ||
|---|---|---|
| Problem | Description | Solution |
 Aphids |
Very small insects, usually
green or black, mostly on the underside of leaves and on
new growth. |
Thoroughly hose aphids off
foliage; you can also apply insecticidal soaps to
control aphids. |
 Japanese Beetles & Rose Chafers |
||
 Leaf Cutter Bees |
||
 Rose Borers |
||
 Spider Mites |
Leaves turn yellow, dry out, and in severe cases, fall off the plant. Tiny webs on the underside of leaves. | Hose the undersides of leaves with a fine spray of water for 3 days in a row to disrupt breeding cycle. An insecticidal soap will also work well. |
 Thrips |
Buds turn brown and do not open, or are distorted. hrips are feeding on the plant juices. | Control with a dust or spray, following the schedule above. Direct spray into opening buds. |
 Blackspot |
Leaves have black spots, and will fall off if fungus in not treated. | Pick off isolated leaves; control with spray or dust. Provide good air circulation and allow foliage to dry out. |
 Canker Dieback |
Rose canes turn dark brown or black and die progressively down the stem. | Always remove damaged part of the cane, then follow a regular spray or dust program. Avoid injury to the canes, and use a sealer after pruning. |
 Chlorosis |
Usually not a serious problem. Leaves turn yellow due to a lack of iron, nitrogen, manganese or magnesium, or a salt buildup. | Add chelated iron to the soil, or in severe cases, spray iron sulfate on foliage. Apply a solution of Epsom salts and water to the soil during the season. |
 Crown Gall |
Tumor-like swellings appear near the bud union, plants lose vigor and die. | Cut off galls with a sharp knife disinfected with alcohol. Paint pruned area with a mild bleach solution. Burn diseased portions of the plant. |
 Mildew |
Leaves are distorted and covered with fine white fungus growth. | Follow a regular spray or dust program, which controls mildew and leafspot disease. |
 Yellow Leaves |
Leaves turn yellow and may fall off. Could be caused by poor drainage. | Bad weather can slow chlorophyll production, so wait it out. Add sand to improve drainage. |